Carolling Panda with Lovely Pandas and Carol Kittens
November 14, 2019
4 Comments
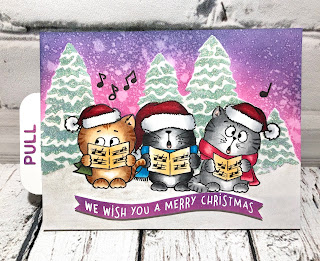
Hello, it's Karen from @karens_kardzz and I have an interactive
Carolling Panda Christmas card to share with you today. I've used
images from Gerda Steiner’s Lovely Pandas stamp set and the Carol Kittens
as well. Here's a look at the card.
I
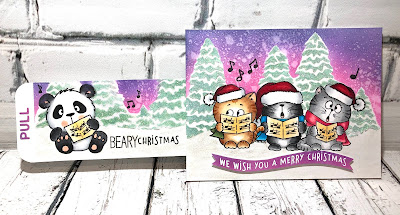
love how when you pull out the tab, the panda is singing along with the
kittens, but is instead singing "Beary Christmas". And it looks like
the one kitten on the left is really giving him the stink eye!
I think it’s
easiest to see the construction of this card on HD video, and
you can see it HERE.
If the link doesn't work, here's the address to copy and paste into your browser https://www.youtube.com/watch?v=0pLkPd7xGzY
I
started my card by making masks of the kittens and the panda as well as
the envelope that the panda is holding. I also made a mask of a
snowbank using Lawn Fawn's Hillside border dies. For the evergreen
trees in the background I used Newton's Nook Evergreen stencil and I
made a mask of this as well.
I stamped out the kittens
on the front of my card, using the masks for the center kitten. I left
room below the kittens to add my sentiment. Then I masked all the
kittens and positioned the snow drift mask over the kittens. I
positioned the evergreen stencil over the snowbank and used Distress
Oxide Evergreen Bough ink to fill in the trees. I then applied Nuvo
Glimmer paste in Moonstone over the trees. Once the glimmer paste was
dry, I used Copic markers to colour in the kittens. I have listed the
markers I used down below.
To create the tab, I cut a
piece of 110# cardstock into a rectangle measuring 2 1/8" x 4 1/2". I
corner rounded 2 of the edges to create the pull part of the tab. You
also need a stopper at the other end, and I made this from a strip of
cardstock that was 1/2" x 2 1/2". I adhered it to the back edge of the
tab with 1/8" double sided adhesive.
|
Showing the pullout tab |
I
masked off the left, rounded edge of the tab where the word pull will
go, approximately 3/8". I then placed the tab in my stamp positioner
and positioned the panda holding the envelope onto the left side of the
tab. I used Gina K black amalgam ink to ink up my stamp and then used a
baby wipe to remove the heart and inside lines of the envelope. I
lightly stamped the image onto the tab and then placed the mask of the
envelope over where it should be on the image on the tab. I then
stamped the image again to get a good impression. I used a copic
multiliner pen to go over the edges of the envelope where it hadn't
transferred completely. I then used the music sheet from one of the
kittens to stamp onto the "envelope" the bear is holding so it would be a
music sheet. Again, I used a baby wipe to remove any unwanted lines or
ink for this.
|
Removing unwanted lines from the music sheet stamp |
I
stamped the word "Beary" from MFT's Polar Bear Pals stamp set, and the
"Christmas" from Lawn Fawn's Here We Go A-Waddling set, just to the
right of the bear. I also used this Lawn Fawn set for the sentiment on
the front of the card. The next step was to mask off the bear and
position the snowdrift mask. Once they were in place I created the
trees with the Evergreen stencil the same as was done on the front, and
finally covered the trees with the Nuvo Glimmer paste. I coloured in the
bear with copic markers, and they are listed below.
The
last step for both the front of the card and the tab was to mask
everything off, including the trees and then I ink blended the sky with
Distress Oxide inks in the colours Picked Raspberry, Seedless Preserves,
Wilted Violet and Chipped Sapphire. I also ink blended these colours
onto a scrap piece of cardstock that was big enough for my sentiment and
to die cut the "Pull" letters from. Once the sky was inked up, I
applied Nuvo Shimmer pen to the snowbanks, and the trees.
I
stamped "We wish you a merry Christmas" onto the piece of cardstock I
had inked in the sky colours with Versafine ink and heat embossed it in
white. I fussy cut this out and added fishtail edges to it. I die cut
the word "Pull" from Lawn Fawn's Picture Changer die set and adhered it
to the tab, but you could easily stamp the word or place an arrow on the
tab.
To assemble the card, you need to make a channel
that the pull tab will run along so I positioned the tab where I wanted
it to be seen on the front ( roughly parallel to the kittens) and marked
this on the back in pencil. I placed double sided foam adhesive along
the top and bottom of the back of my card front, and another strip that
would butt up to the stopper end of the pull tab. I also placed foam
tape along the stopper edge of the tab so it couldn't push through to
the other side. Finally, you need to place small pieces of foam tape on
the left edge of the card so the tab cannot pull out of the card
completely. The picture below shows placement of the foam tape.
|
Placement of the foam tape - notice the stoppers at the front and back of the tab |
Finally, I removed the backing on the foam
tape and keeping the tab in position, turned it over and adhered it to
the card front.
So here’s that list of copic markers that I used:
Panda - N6, N4, N2, N0, C2, C0, R00
Kitten on the left - E51, E53, E33, YR27 Scarf - G99, G94, G82
Middle kitten - N8, N6, N2, N0 Scarf - B04, B02, B00
Kitten on the right - N4, N2, N1, N0 Scarf - RV 25, RV 14, RV 21
Hats - R39, R29, R35
Music sheets - Y21
Sky “fill in” - V12
Whew!
I know that's a long post, but this is a fun card and I hope you’ll
give it a try. Truly, I think it's easiest to just watch the video for
the best explanation of how to make this one.
4 Responses
Leave a comment
Comments will be approved before showing up.
Jeolype
May 23, 2021
lasix overnight delivery