Leaping Frog Masculine Birthday Card

August 12, 2020

Leaping Frog Masculine Birthday Card

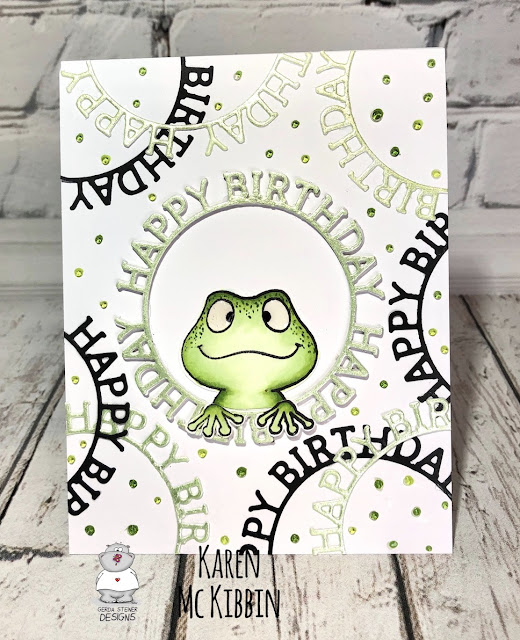
Hello again and welcome!  It’s Karen here today and I’ve got a card that I actually made a while ago, but have since made a video for it that I want to share with you.  I think of this card as being appropriate for a masculine card, so I’m going with that!  It features the adorable frogs from the “Frogs” stamp set from Gerda Steiner Designs  and I added a few images from the “Lucky Duck” stamp set as well.


If  you would like to see a video of how I made this card, I have it posted on my YouTube channel  and you can CLICK HERE to view it.


After copic colouring my images and cutting them out, I added glossy accents to all the frogs eyes and set them aside to dry. To create a shiny green cardstock for the happy birthday circles on the front, I combined some Nuvo glacier paste in Pineapple Delight and Sea Sprite to make a bright green, and spread that out on cardstock in a circle pattern. When it was dry, I used the Simon Says Stamp “Birthday Circle” die to cut it out. I also used this die to cut some circles from black cardstock. I stacked about 3 circles from white cardstock and added a final layer in the green for my center circle, then glued this in the center of my front panel. I glued down portions of circles around this in a mix of the black and green die cuts. I cut the hands from the front frog, trimmed his chest to fit in the circle, and then glued his hands down onto the center ring. Finally, I added dots with some of the copic markers I had used for the images, and added glossy accents to the dots.

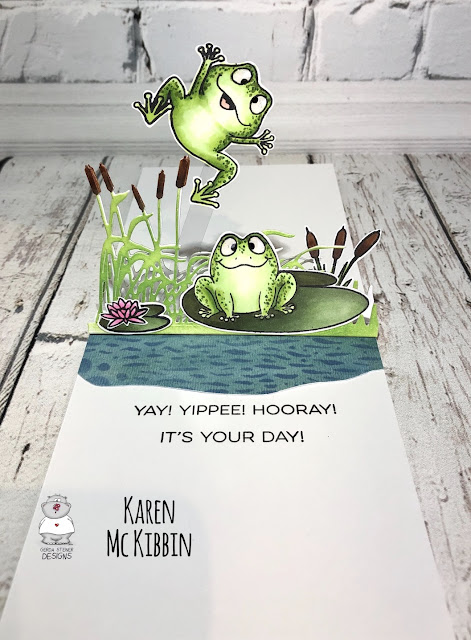
For the inside of the card, I watercoloured a small piece of watercolour paper in a mix of blues and greens to make my pond. I used Distress Oxide Faded Jeans to stencil over the water with a stencil from The Crafters Workshop called Mini Sea Bubbles. I freestyle cut this piece to resemble a pond.

I die cut two grassy borders for the triangle pop up. You could use any straight grassy border in your supplies or even make your own border by cutting grass into 2 pieces of cardstock temporarily adhered together. I used a die from Paper Roses called Cattails and Grass border die. I then used brown copic markers to colour the cattails and Distress Oxide in Mowed Lawn for the grasses. I coloured both grassy borders, but for the one in back, remember that you actually colour the wrong side of the die cut. I creased both of these grassy die cuts at 1/4” from the straight edge, creased the folds and added double sided adhesive to the folds.

Next, I adhered the right leg of the leaping frog to a piece of scrap acetate with double sided tape and adhered him to the front grassy border with more double sided tape. Then I attached all my other images with glue, being careful not to get excess glue on the grassy areas.

I glued down my “pond” by positioning it 1/4” from the inside crease of my card. Now I could see where to stamp my inside sentiment and this is best done before adding the triangle pop up. I used a sentiment from MFT’S Yay for You set.

I glued together just the top portions of the grassy borders, to just about a quarter to a third of the way down. You need to leave the bottom of these borders unglued so they can form the triangle pop up. Then I removed the backing paper from the back grassy border, and lined it up along the crease on the inside of my card and pressed it down. Finally, I removed the backing paper on the front grassy border and folded my card base up and over the grassy borders and pressed it down. And that was the card done!

This is such a fun card to receive because the inside is so unexpected, and those frogs definitely make it a masculine card - always a bonus!!  I really hope you’ll give this one a try. Hope you have a great day!


Leave a comment


Also in Gerda Steiner Designs

Have a berry sweet day by Noga Shefer

February 17, 2023

 Hi crafty friends,  Noga  here and I am so happy to share with you a project for Gerda Steiner Designs today.


My card featuring the  adorable Strawberry Mouse - GSD795
 
To make this card I took an A2 panel of plaid cardstock and panel of Bristol smooth cardstock.

I sponged lumberjack plaid distress oxide ink on the Bristol smooth and  die cut a scalloped edge.

Next I colored the sweet image using...

Continue Reading

Penguin Birthday Shaker Card

December 28, 2022

Hello everyone, it's Karen here today and I hope you had a good Christmas holiday! I've got a shaker birthday card for you today with some happy, little penguins.

I've used the Penguin Cake - 4x6 Clear Stamp - GSD799, to create the cake and penguins. I masked the two front penguins after stamping them on some Neenah Solar Crest card, and then stamped the cake and the middle penguin afterwards. I...

Continue Reading

Get well soon by Noga Shefer

December 22, 2022

 Hi crafty friends, Noga  here and I am so happy to share with you another project for Gerda Steiner Designs today.


My card featuring the adorable Positivi-Tea 4x6 Clear Stamp Set stamp set.
This is perfect for "get well soon" cards.

To make this card I took an A2 panel of Bristol smooth cardstock and cut it with circle die.
For the background, I die cut the scallop frame die out of white cardstock....

Continue Reading